Monday 17 May 2010

Got wood?

For a second-life transformation to be successful, the inidividual must forget the previous function and associations of the object. They must also 'see' the raw material that the object is made from.

For example, if I were turning a broken chair into a side table, I would need to forget that the broken pieces of wood were once used to support a person's weight. Below are several images showing a variety of objects that, despite of their different functions, are made from wood.


The above principle applies to all products - all objects can be categorized in to the raw material(s) that they are made from. By doing this it will make the work of any second-life designer easier.

Second-life skateboards


As promised, below are several examples of skateboards that have been used to achieve a second-life function. They are all great examples of the cradle to cradle approach to a consumer object, however they have been graced with new functions rather than the restorative process shown in the previous post.


Artwork - Leaving the underside untouched shows both the deck design and the scuffs made by the original owner. These marks make it clear that the object is a second-life creation, a good thing.


A very simple object using all the wood of the skateboard. The chair shows the marked underside and the restored top side, which has had the griptape removed and been buffed to a shiny finish.

This design is one that individuals would be able to replicate easiy with a few instructions. Similar to the Tord Boontje chair, instructions could be given away free, the aim not profit but for individuals to make something useful from their 'waste'.


A simple design that uses the core of the skateboard well, showcasing the different layers rather than covering them. The go-to second-life object when the skateboard is actually broken. Many rings can be sourced from a small section of the skateboard, leaving enough material to manufacture another object - using the objects full potential.


The greatest thing about this shelf is that with one skateboard, the individual can source two objects instead of one, and because of its position, the user gets a great view of the deck's design underneath.


The last example appears to have been sourced from a skateboard that really went through the mill. The object highlights the need for individuals to forget the previous function and the associations of the object if it is to become a successful second-life object.

Rewind

This post may put my blog out of order, but I feel that it is a good example of the cradle to grave & cradle to cradle product life cycles.

The reason it is not already on my blog is that in the end, the skateboard was the wrong object to choose and I tried to get rid of all the evidence of my mistake. However, as the year is coming to an end, I thought I had better document both successes and mistakes throughout the project because both developed my project to where it is now, enjoy!


After the skateboard's first-life, the owner possesses the power to influence the route of the object after this stage.


After finding a skateboard dumped near a building site, I set about restoring the worn object to its original condition. At first I leant towards the restoration route rather than redesigning the object's function, but a short time into the process I began to explore the possibilites of the latter (look out for examples in furture posts).


The underside of the deck required some serious maintenance, I found it scratched and waterlogged. After stripping the design off, I sanded the board until I found a nice clean layer of wood to work with. My aim at this stage was to achieve as good a finish as possible.


Achieving the perfect finish required a lot of priming and sanding. This was the toughest stage and a lot of man hours were put into the process, disregarding some of the suggestions of my lecturers to call it a day and move onto another object.


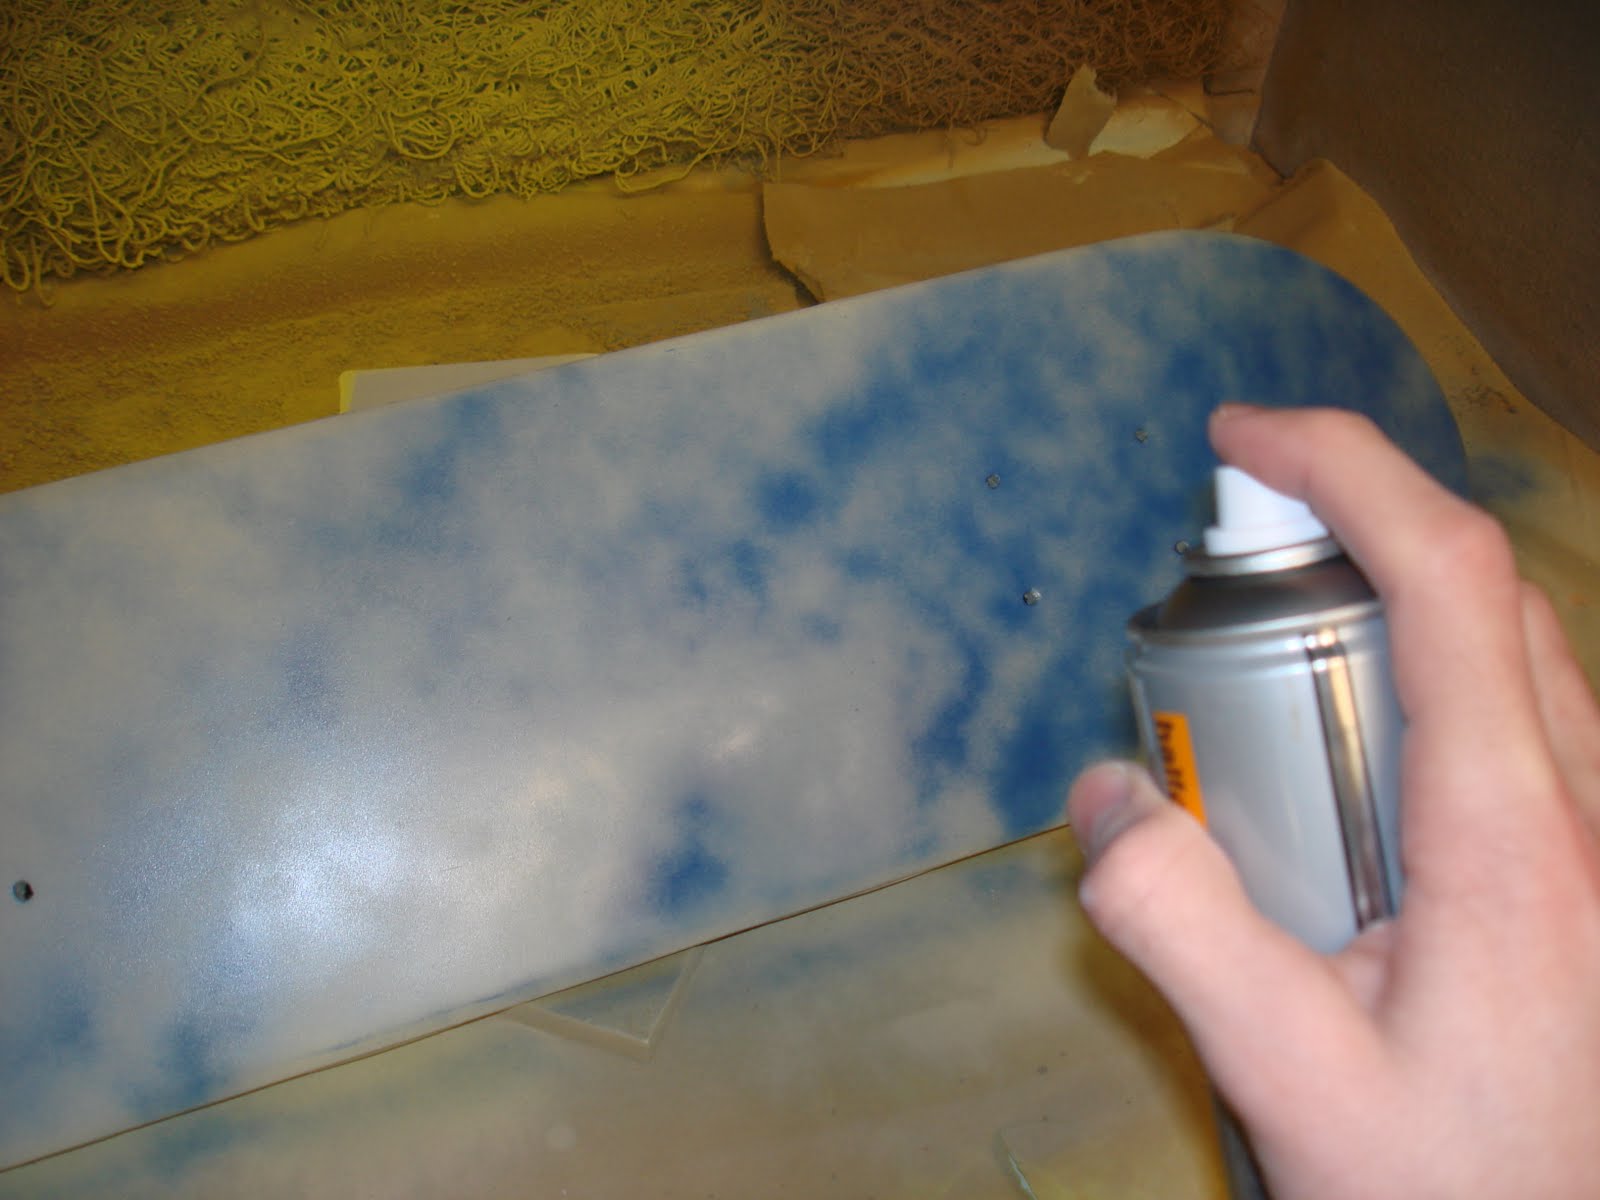
First coat of spray paint after countless layers of primer and filler. To achieve a strong colour finish, I built up the layers rather than putting on one thick coat of paint. In between each layer I would lightly sand the surface to remove any remains of the wood grain underneath.


Skateboard after several coats of paint. The paint was still wet, so slightly shiny. I would then lightly buff the surface with a low-grade steel wool to remove any imperfections residing from the spraypaint.


Finished. The old trucks and wheels were attached and I also left the griptape on top in the condition I found it to show some trace of the object's first-life.


In the end, my lecturers were right. I should've abandoned the skateboard and used another object. However my instinct was to run with the object I found. I fell in love with the shape and all the associations attached to the skateboard. This is an example of the cradle to cradle cycle, the restoration process, and a time to jump ship and find new land. Might have been better choosing a surfboard instead!

Sunday 16 May 2010

Safety first


I saw this nice second-life example on the Stewardship Community website. It is both simple and practical and is an example of how a very useful object can be achieved by some time and imagination. If you're lacking in the imagination department simply follow the instructions above!

Decision tree for plastic drinks bottle

The image below resulted from my insights in the previous post. I realised that not everyone will see the second-life potential of consumer 'waste' items such as plastic bottles. I therefore asked a fellow student about the decision process he makes after he has consumed the coke, fanta, etc in a plastic bottle.


The image shows that the student would be most likely to recycle a plastic bottle and be least likely to upcycle it. He stated that he didnt find the idea of upcycling appealing and felt many upcycled objects were far too art/craft-like. I may be better off designing something that would attach to a plastic bottle to make it more valuable rather than altering the bottle itself.

I must consider the reasons why people view plastic bottles as waste. The image above hinted at a few examples, such as the valuable thing is the liqid, not its container and once it has been consumed, the natural action is to dispose of the bottle.

The plastic bottle must be percieved to be valuable when empty. If it is viewed in this way, individuals will care where it ends up, and I aim that that place will be the recycling process (but only after it has had a second-life function achieved).

Saturday 15 May 2010

Insights

The past several posts have documented the manufacturing processes that turned a few scraps of wood and several used plastic bottles into a functional and comfortable brush.


The sequence of posts highlighted a small amount of the functional potential plastic bottles have, however a problem relating to second-life products in general was also highlighted: Why?

I could list several reasons stating why second-life products are a positive creation: prevents 'useful' rubbish going to landfill, helps develop creative and manufacturing skills and saves users spending money on an object they could make themselves. All these examples are true, though I must ask the question "Would I have made the brush if I hadn't been doing this project?"

Not every individual has the same ideas or is influenced by the same things as I, and as a designer I must remember that not everyone in the world is like me. I must not design selfishly, but instead design selflessly for the end user.

I feel like sweeping tonight (part 3)


Once the stock unit has been fixed to the brush head, I secured the handle in the stock unit using a screw. By using screws instead of glue and nails, all the components are secured semi-permantly, allowing the brush to be dismantled.


To complete the brush, the seven 'bristles' that had been sourced from used plastic bottles were screwed into the seven bottle caps in the brush head.


View from the rear of the brush head - four bristles at the back instead of three have a greater surface area when sweeping towards you. The angle of the handle makes sweeping towards you much easier and more comfortable than sweeping away from you. Also the bristles sweep much more material when swept in this manner.


Full length view of the brush - there is an adequate handle length to accomodate both the shorter and taller user comfortably.


The brush is very effective, collecting the offensive material quickly. It is also relatively light and manouverable for having the material constraints that industrially designed and manufactured brushes do not have.


A close-up image shows that even after sweeping on rough pavestones, there is very litte damage to the plastic bottle bristles. The heating process has strengthed the material though it is still able to bend slightly to prevent snapping.

I feel like sweeping tonight (part 2)

The previous post showed the manufacture of the brush head, this one will document the completion of the brush by the manufacture of the handle and the stock component.


After working out the optimum angle of the handle during brushing, I measured and cut the stock unit from a scrap block of wood. The stock component would house the handle and be fixed to the brush head, it therefore needed to be the right shape to ensure a comfortable brushing action.


I bored the hole that would house the handle at the angle measured previously. I would need to do this again for the screw holes that would secure the handle in place. I had never drilled a hole at an angle like this and it shows that you're always learning when you're in the workshop!


There was no drill bit that would bore a hole that would fit the handle perfectly, so I chose to use one slightly smaller and sand the required amount off the handle. I sanded a little, then checked the size, repeating the process until the handle had a very secure fit.


To secure the handle in place but allow it to be changed if it was damaged, or to allow me to dismantle it for storage, I drilled a small pilot hole for a screw into the stock unit and the handle.

I also drilled a hole for a screw that would fix the stock unit to the brush head.


The screw will hold the stock component in place, which will then house the handle.

I feel like sweeping tonight


To keep with the theme of reusing and recycling materials, I used old scrap pieces of wood I found in the workshop and fitted and glued them all together, similar to completing a jigsaw. This technique is also used by Piet Hein Eek (look for previous posts).


After cutting the shape for the brush head, I bored pre-measured holes into the block of wood. These would eventually house the appropriate bottle caps to ensure the plastic bottle 'bristles' could be screwed in securely.


I thought a screw would secure the bottle caps in place, and they did, however when unscrewing the bristles, the rotation of the process was simply spinning the bottle cap and I could not get the bristles free. This would be problematic when needing to change the bristles. A small nail was added to each bottle cap to hold it in place when unscrewing the bristles.


I had underestimated the length of the screws and once in place, the seven screw points had broken through the back of the wood. The sharp points would prove dangerous if anyone attempted to handle the brush so I simply filed down the points so they were flush with the wood.


Before making the stock unit that would house the handle and be attached to the brush head, I had an idea for a similar but handier product. This showed how one idea can be developed and refined to become even more functional (look out for future posts on the hand brush).

sorting the good from the bad...


The previous post showed examples of a couple of basic processes I had applied to the plastic bottles - heating and cutting. I found I could make a very simple bristle with part of the plastic bottle, this lead me to wonder if all parts of the bottle could be used.

It wouldnt seem fitting to my project if I only took part of the plastic bottle and discarded the rest. However, I believe that for this second-life example, the bristle, the half of the plastic bottle with the thread will work much better than the other half - the thread will allow me to screw the bristle into something else...

Sunday 2 May 2010

bottlemania

I have my product (plastic bottle) that will provide the raw material for my second-life object, and I understand the principle that to become a second-life object a first-life one must be subjected to manufacturing processes. So, which processes?

I started in the workshop by heating some plastic bottles in the 'plastics oven' to find out if I might be able to create a raw plastic material that could then be heated, shaped, blown, etc. To my disappointment the plastic bottles did not melt as I had hoped, however, they did shrink dramatically in size and increase dramatically in strength.


I was still able to cut the bottles fairly easily with a stanley knife, but where I cut, a smooth but strong edge was left. I then cut several lengths down the bottle and was left with a very crude 'bristle'.


material... manufacture... product


All products, regardless of first or second life, have been formed by a manufacturing process. For first-life products, raw material must be manipulated by a range of processes, and for second-life objects, existing products become the raw material and these in turn must be altered to become successful second life objects.